Wednesday, January 1, 2014

My January Design Team Blog Post over at 2Crafty


 Welcome to 2014!
Happy New Year to Everyone and thanks for visiting.
Janice here today to share some projects with you.
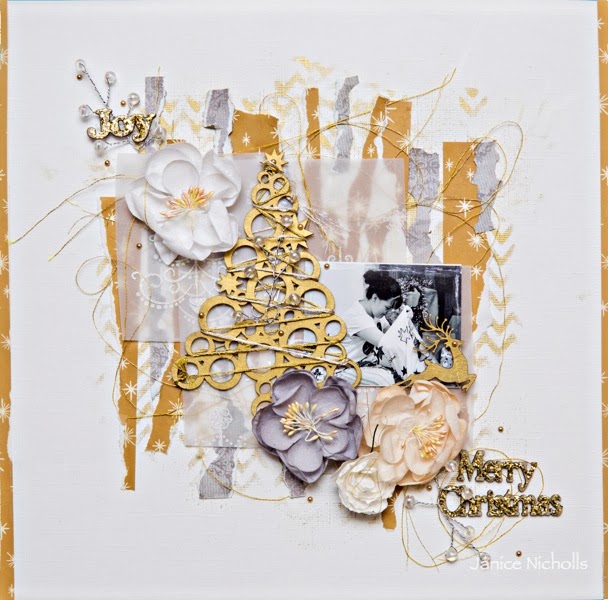
Remember These Moments

My 1st layout features lots of gorgeous 2Crafty chipboard  pieces, combined with
 washi tape, rub-ons, gesso, inks, mist, gauze and stranded thread.

 I have framed this photo with a chipboard Polaroid Frame.
 
 To alter this Frame I started by adding  some Rubons on it (which don't show up in
 this photo), then I randomly added patches of Lagoon Blue ink,  then using my
 finger I smeared white paint all over it leaving some areas thicker than others to give
 a white washed look.
 
When dry I added a raw 2013 date.
 I think it is very important to add dates to your pages and these multi pack
 dates make it so easy.


Lots of layers....
washi tape, Rub-ons, gauze, thread, gesso, paint, mists and Assorted Chippie Arrows.


 Remember is from a multi word pack.
 
They are fantastic to use as a title or part of a title for your page.
Here I primed the word, let it dry, then inked it with Lagoon Blue Versa Colour ink,
 then I added a light smear of white paint.
 
If you want to ink your chipboard it is best to prime the pieces with gesso first, let it dry
 then ink and the ink will hold its colour and not soak into the chipboard.

 Here I have added  a few Assorted size and design Arrows
I have inked some, then randomly covered  them with gesso.
I have left a couple raw and added tiny bits of ink and gesso.
*****************************

My 2nd layout.

Enjoy Today

 This layout was created using an A4 photo and I have added my embellishments on top of it.
I have used a Martha Stewart punch across the top, so the page appears as a calendar page.
 I have used some little ATC tabs across the top which have been
 painted white and attached with brads.

I Just love these little ATC Seagulls.
 We spend lots of time at the beach and see lots of seagulls, so when I saw these little 
chipboard seagulls I was super excited and knew they would adorn many of my pages.

Here I have added 3 different size seagulls using pop dots to add dimension.
They are primed with gesso, painted white, then I have added some grey ink to
 their wings and added a black spot to hi-light the eye.


2Crafty have numerous words and phrases.
These loopy font titles are just gorgeous.
has been primed with gesso and painted white. I have matted it by gluing it to a piece
 of cardstock and using a sharp craft knife to cut around the edges.
 Then I highlighted a few places with a black pen.
 Pop over to here and see the varied selection.


The little  Name Plate, has been primed with gesso and painted white and I have
 used it to add a date.
**************************************

My 3rd layout.
Smile

If you are a member or follower over at CSI you may have already seen this layout.
 This is how I solved Case No. 99.
Featuring lots of the gorgeous 2Crafty chipboard  pieces.


"Her gorgeous smile radiates inner beauty"

On every layout we find ourselves needing a title, and with the varied selection of words
 2Crafty have, you can easily find a title to match your creation.

I have primed smile with gesso, then added some Ranger White Opal liquid pearl, then
 spritz it with Studio Calico Mister Hueys "Sunshine" mist. 


Chipboard is very versatile and can be cut up and added as layers to your pages.
This is a piece which I have covered with ink  and then spritzed with "sunshine" mist.


 The Fanciful Butterfly is covered the same way as the smile font.
************************************************


I am sharing an extra layout this month
Quiet Time 2013

Today I also wanted to share another Case I have solved over at CSI using lots 
of Gorgeous Chippie Pieces. This is Case No. 98
You may have already seen this layout.


Primed with gesso, then coloured with different coloured Versa Coloured inks
and some clear  crackle paint.
Coated with a thick layer of Tim Holtz- peeled paint- Distress crackle paint.

 Covered with a thick layer of Tim Holtz-white- Distress crackle paint.
Once dry and cracked, I added some green-peeled paint to the bottom of the posts.
I love the effect this paint gives.
I soaked this Butterfly in water for a few hours, then carefully pulled apart the
 layers to add some dimension to the wings. I held each layer apart
with toothpicks and let it dry overnight.
I then coloured it with ink and stamped on the pattern.
was primed with gesso and inked.
I feel very lucky to be able to play with this gorgeous chipboard and add it to my layouts.
I hope I have inspired you  to have a look at all the products and to add
 some to your next project.
Make sure you don't miss any of the new updates  by becoming  
a follower of this blog and also our Facebook page.
Remember to share your 2Crafty layouts on our Facebook page,
we would love to see what you create.
Thanks for stopping by the 2Crafty blog today.
 

Janice xx
 

Tuesday, December 24, 2013

Thursday, December 19, 2013

New 2Crafty Design Team for 2014


The Team
Felicity Wilson – Australia (Design Team Member)
 Helen Tilbury – South Africa (Design Team Member)
 Janice Nicholls – Australia (Design Team Member)
 Stacey Young – Australia (Design Team Member)


  Returning DT Members


Di Garling – Australia (Design Team Coordinator)
 Chantal Vandenberg – Australia (Design Team Member)
 Elena Olinevich – Belarus (Design Team Member)
 Lindy Gillespie - Australia (Design Team Member)
 Nicole Dioron - Canada (Design Team Member)
  Sarah Groen – New Zealand (Design Team Member)

We also have a wonderful group of
" Resident Guest Designers"
 lined up & these girls will pop by on a regular basis and
 share their  wonderful talents as well.

Aida Domisiewicz - Poland (Guest Design Team Member)
 Chantalle McDaniel - Australia (Guest Design Team Member)
 Debbie Tehrani - USA (Guest Design Team Member)
 Ebony van der Starre - Australia (Guest Design Team Member)
 Jane Clark - Australia (Guest Design Team Member)
 Lisa Oxley - Australia (Guest Design Team Member)
 
Check this out......
It is such an honour to be on this awesome 2Crafty Design Team.
I am pinching myself that little ole me is amongst this amazing bunch of very talented  girls
I must admit I am a little overwhelmed but
I am also really excited about the journey ahead and working alongside these beautiful girls.
Let the fun begin.

A little sneak of my January Post.


Pop over to the blog for lots of 2Crafty chippie inspiration.
We would love you to become a follower of the blog and/or Like our Facebook page
 
 Thanks for stopping by.
 
Janice xx 

Wednesday, December 18, 2013

Monday, December 16, 2013

My 2Crafty Design Team December Post part 2

.Wishing you and your Family a Merry Christmas
 
I have created 2 cards for my 2nd project.
I enjoy making cards for Family and Friends.

"Peace"   & "Noel"

"Peace"
I started with white cardstock for the base, then built up the layers one by one.
 I placed a mask down and inked in random spots,
added pieces of embroidery thread and then stuck down strips of torn paper and
 pieces of washi tape. I primed the chippie with gesso, let it dry and inked it with
 Versa Colour Gold ink.
 I added gold stickles to the little star.
 I then cut a mat for the  tree, stuck the chippie to the mat and then
 stuck it on top of the layers.
Peace was painted white and glued down.
2Crafty Chipboard Pieces I have used:
"Noel"
I started with white cardstock, place it into an embossing mat and run it through my Cuttlebug..
I placed a mask down and inked random spots and added some thread.
 I cut a mat for the tree, glued  the chippie to the mat, and stuck it to the card.
Noel was primed with gesso and inked with Gold ink.
2Crafty Chipboard Pieces I have used:
^^^^^^^^^^^^^^^^^^^^^^^^^^^^^^^^^^^^^^^^^^^^^
My last  layout is one you may have already seen.
I am Guest Designing over at Orange Paperie & Co during December.
This months challenge is a Colour Challenge
Gold, Silver and White.
I chose to scrap about one of my favourite times of the year.
"Merry Christmas"

 I have used some gorgeous 2Crafty Christmas Chippie pieces,
  torn paper strips, stencil, ink, thread and vellum to build layers on this layout.

 The Holly Tree, was primed with gesso, let dry and inked with Versa
 colour Gold Ink.  I then wrapped gold and silver stranded thread around the
tree like  tinsel and added some Pearls. 


Merry Christmas is covered in Ranger Gold Ice Stickles.
This adds a nice glittery Christmas feel to my layout.


How cute is this little Prancing Reindeer.
He is covered with Gold Ink.


Joy is covered with Ranger Gold Ice Stickles.
These little words are perfect to place on your layouts.

^^^^^^^^^^^^^^^^^^^^^^^^^^^^^^^^^^^^^^^^^^^^^^^^^^^^^^^^^^^^^

Thanks for stopping by the 2Crafty blog today and for looking at my projects.
I hope you have been inspired to create a Christmas layout during December.
Click here to find more Fabulous 2Crafty chipboard pieces

Warmest thoughts and Best Wishes to Everyone for a Wonderful Christmas
 and a Happy New Year.
Janice xx


Sunday, December 15, 2013

My 2Crafty Design Team December post

This is the 1st of my 3 Design Team projects over on the 2Crafty blog.
 
Merry Christmas Wishes to you and your Family
 Hello Everyone :)
Janice here today.
Its December and its almost Christmas.
Its the perfect time to create using the gorgeous 2Crafty
 Christmas Chipboard pieces.
My 1st Layout
"SEASONS GREETINGS"

To make this parcel I used a thick piece of cardboard and covered it with paper.
 Using the same paper I cut 2 different size triangles and stuck them across the bottom.
 I then wrapped the whole piece with embroidery thread. I added this gorgeous chippie
 piece to adorn it and also added 3 chippie tags.

 I love this gorgeous Heart Charm chippie piece.
 My parcels are always wrapped an given with lots of love,
 so I thought this was perfect to add to my gift.
 I primed it with gesso, let it dry, then Inked it with Gold Versa Colour ink.

 Gifts always need a To and From tag.
I have used washi tape to cover 2 of the tags
 and I added a  Jingle Bells Rub On to cover the other tag

Seasons Greetings was primed with gesso and then inked with Gold ink.

Thanks for stopping by.
I will have more to share tomorrow.
 
Janice xx

Sunday, December 8, 2013

Be

 
Case File No. 100
 This is my take.
{Be}
 
Scheme;  I loved these colours.. All 5 are there
Evidence: Wood, stars, numbers, grid
Testimony: I put a border around my journaling strips.
 
Thanks for stopping by.
Janice xx


Thursday, December 5, 2013

Guest Designing at Orange Paperie & Co

I am very Excited and Happy to be Guest Designing on this Fabulous little blog.
 
This is what Kim wrote on the Orange Paperie & Co blog.
 
Hello all and welcome to December
 Firstly I want to tell you about our DECEMBER CHALLENGE
I thought it would be nice to have a little colour challenge.
W  
White*Gold*Silver
Now it doesn't have to be a Christmas layout as such but most of us have done Christmas ones.
Now onto our Guest Designer for this merry month.
I would like to introduce you to the very talented
Janice Nicholls


 Hi there, I’m Janice Nicholls and I live in a small country town in Cummins, South Australia.
I started scrapbooking in 2006 and my 2 beautiful children and family all feature in my work. My style is ever changing. At the moment I love double photos, grouped and layered clusters and white space.
I also like to add layers to my background using stencils, gesso, mists and inks.
I scrap mostly 12 x 12 layouts. I enjoy trying new techniques, not always successful, but it is fun trying.
I have been very fortunate to have been on some fabulous Design Teams and have had my work published in magazines.
I am honoured and thrilled to be Guest Designing here at Orange Paperie & Co for December.
 A big Thank You to the very talented Kim Ewins for inviting me.
Kim’s theme for this month is Gold, Silver and White and being December I chose to scrap about one of my favourite times of the year…Christmas.
Here is what I have created.

{JOY}
I hope I have inspired you to join in the fun here at Orange Paperie for December. Remember to link up your layout and share it with us…we would love to see what you create.

A truly GORGEOUS layout Janice
I know you have inspired me!!!!
A HUGE THANKS to Janice for being our DECEMBER guest designer.
Make sure you pop over and visit Janice's blog to see more of her truly beautiful work.
**********************************************
Thank you so much Kim for inviting  me.
 I had lots of fun creating this layout.
I have use lots of strips of patterned papers , some vellum,
stranded thread, stencils, Prima Flowers, D-Lish elements
and some Gorgeous 2Crafty Chipboard.
 
The girls on this little blog are all super talented and work really hard.
Pop over to the blog and check out what they have created,
 I'm sure you will be inspired  by their  Gorgeous  pages.
 It would be great to see you support them by playing along with the challenge and sharing your  projects.
Remember it doesn't have to be a Christmas layout, it is a colour challenge and we would love to see what you  create.
Happy Scrapping.
Thanks for stopping by.
Janice xx


Dear Santa

My Design Team Layout for the
December challenge over at
Scrap It With Attitude.
 
"What's Under your Tree"
 
{deAR sANtA}
A layout using lots of layers and cut outs.
A very old photo of my  gorgeous little  ones opening their presents on Christmas morning.
Need inspiration to scrap your Christmas photos, then this is a great challenge.
Join the Scrap It With Attitude Facebook group, see  the other fabulous creations by the Design Team and upload your layout to have a chance to win some great prizes.
Join in the fun.
Thanks for stopping by..
Janice xx
Related Posts Plugin for WordPress, Blogger...